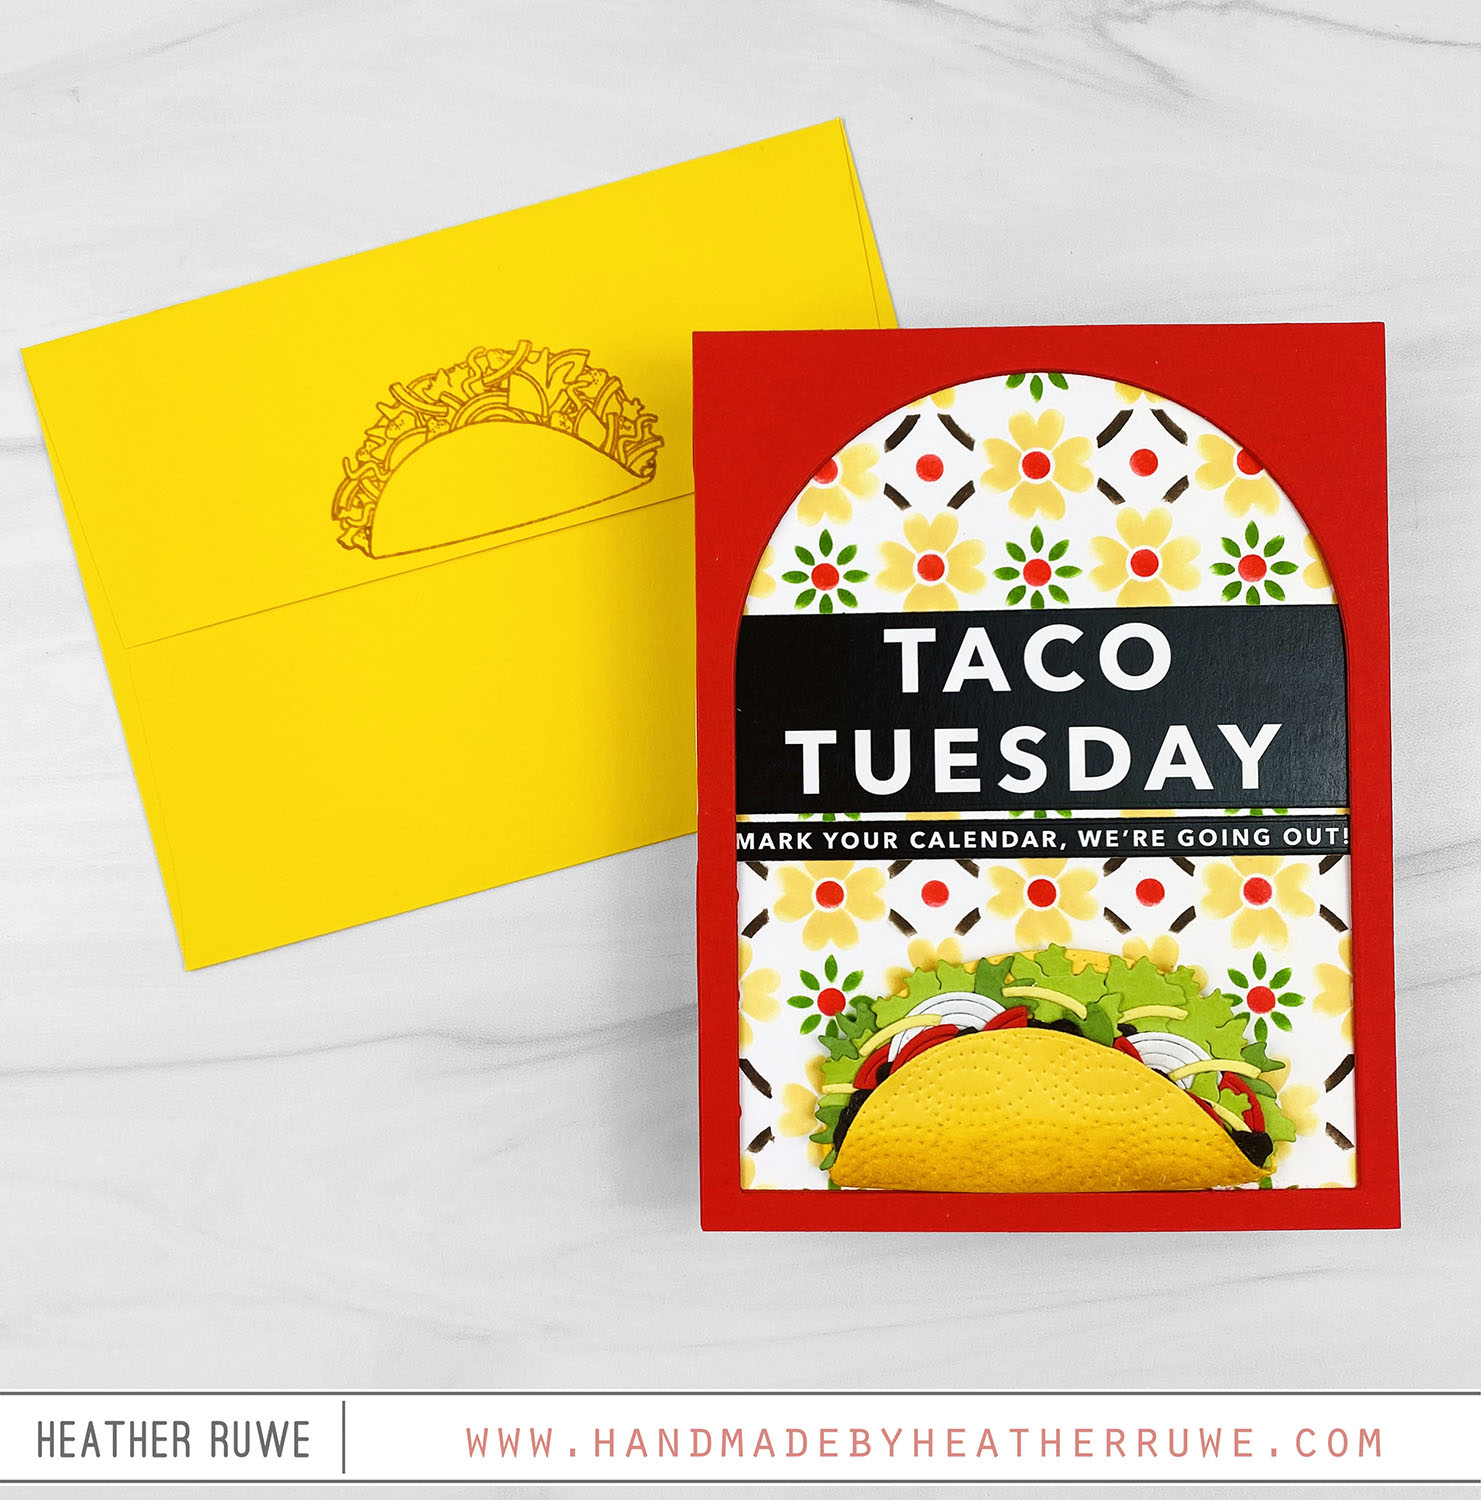
Happy Thanksgiving, crafty friends. Recently, I shared THIS card and wanted to reproduce it in monochromatic, brighter color combos…. I created these cards exactly as I did THIS card. I applied ink through THESE layering stencils to create the leaves, cut them out with THIS die, and inlaid them into a background splattered with paint. I added THIS sentiment and THIS heart die cuts. Here’s a closer look at each… I would love to...
Pop Up Cards + Giveaway
Hi, crafty friends. Today’s cards were so fun to make and they pop up when removed from the envelope. They were inspired by a video lesson taught by Jennifer McGuire in THIS Online Card Classes… To create these cards, you need to die cut any shape that is symmetrical six times. You adhere together three of the shapes together and three for the other side. You adhered the two pieces next to each other...
Sugar and Spice Release Blog Hop
Hello, crafty friends. Today’s cards are part of THIS Blog Hop celebrating THIS new release… To create the first card, I started by applying a rainbow of Distress Oxide inks through THIS stencil. I spritzed the piece with THIS shimmer spray for some sparkle and shine. Once dry, I laid THIS coordinating die in place and dry embossed it with THIS mat in my die cut machine. This just makes an impression and makes...
So Grateful Card
Hello again, crafty friends. Today’s card features products from THIS STAMPtember release… To create this card, I started by stamping THIS text on an A2 panel of kraft cardstock using brown ink. After adhering it to a side folding notecard, I added a small dark brown strip of cardstock along the bottom. I sprayed a piece of watercolor cardstock with a few Distress Spritz colors and die cut THIS die from it. I cut...
LOL Card
Hi there, crafty friends. I have more inspiration to share today featuring THIS new release from Simon Says Stamp… To create this card, I started by stamping THIS laughing emoji image repeatedly on an A2 panel of white cardstock using colored ink. (I used Sprout, Parsley, Tidepool, Oceanside, Pebble, and Dove ink colors from Concord & 9th). I stopped the stamping slightly above half of the panel. I stamped three additional emoji images and...
Adding Movement to Cards
Hello, crafty friends. I’m a big fan of interactive cards. Today’s card shares two ways to add movement to your card… To create this card, I started by creating the galaxy background. I used all Distress Oxide inks and started applying ink in circles all over a piece of A2 sized watercolor cardstock. I used shades of pinks, oranges, and blues. Once the background was filled with color, I lightly blended black ink on...
Happy Camper Release Blog Hop-Day 2
Hi there, crafty friends. Today’s cards are part of THIS Blog Hop celebrating THIS new release… I love cover plate dies because you can stretch one background to create two cards! To create these cards, I started by ink blending a panel of THIS watercolor cardstock with Distresss Oxide inks. I spritzed it with THIS spray for some sparkle and texture. After it was completely dry, I die cut the panel using THIS die....
Elevate Gift Giving with Die Cuts
Hi, crafty friends. I love to stretch my supplies and today’s project is a great example of using your die cuts to elevate your gift giving…. I die cut THIS die from teal and white cardstock. I die cut the word three times and adhered them together for dimension. I cut two of the shadow dies from white cardstock. I added foam tape between the layers placed a skewer in between to stick in...
Happy Summer Jeep Cards
Hello, crafty friends. Today’s cards are the cards I created for Aiden’s teachers for the end of the school year. These cards are all about specialty cardsock and how much interest they can bring to your cards and bring to life your die cutting. Random fun fact about me…My first car was a Jeep Wrangler. I still have it and we use it every summer for joy rides and date nights. It always reminds...
Butterfly Thank You Card
Hi, crafty friends. I have more inspiration to share with you today using THIS new release… To create this card, I started by swiping three colors of Distress Oxide inks on a piece of white cardstock. I embossed it with THIS embossing folder and spritzed it with water for some added texture. I die cut THIS oval from white cardstock three times and adhere them together to create a frame on top of the...
