Embellishing Gift Packages

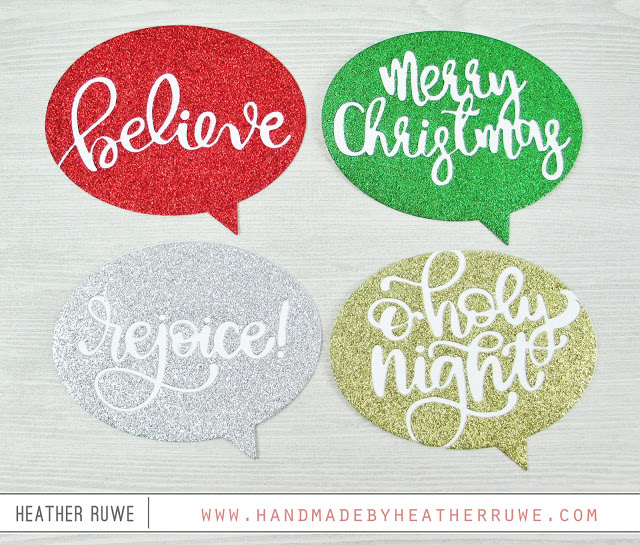
Hello. Today I’m sharing how to embellish gift packages. I will be focusing on Holiday gift packages for this project, but you could do this for any special occasion. So, do you remember THIS speech bubble card set I created? Well, I had the negative glitter die-cuts left over and wanted to put them to good use… I simply adhered the negative pieces to the left over white speech bubbles. Easy peasy. Then I adhered them...

SSS DieCember Release Blog Hop

Hi, friends. Happy DieCember! I will be sharing four cards today featuring Speech Bubble Windows created with THIS new die set… I die-cut THIS, THIS, THIS, and THIS word from foil paper and cut the shadow from black cardstock. I die-cut one of THESE speech bubbles from the center of some of THIS new glitter cardstock and four top folding white note cards. I adhered a piece of acetate on top of the opening...

More DieCember Inspiration

Hello. I’m back with  more DieCember inspiration using another Story Book die from Simon Says Stamp. If you follow my blog, you probably know I’m a big fan of the story book die collection. I’ve made several cards using them. Click HERE to see yesterday’s post featuring the penguin story book dies and click HERE to see another previous story book animal project. Today’s card uses THIS cute moose… As soon as I saw him,...

SSS Diecember 2017

Hi there. Happy DieCember! If you’re unfamiliar with Diecember, it’s a month long party celebrating wafer die cutting. Simon has released a fabulous new release, which you can see HERE. I’ve also linked all the new products below. Today’s card features several new dies… If you’re a follower of my blog then you know I’m a big fan of the Storybook dies from Simon. They have released three new penguins. I die-cut THIS, THIS,...

One Product, Five Ways- Day 5

Hi. It’s wrap up day for one product, five ways week on my blog. Today’s project shares how to tie everything together with coordinating envelopes. I used THIS die on all the envelopes in different ways. For day one’s card, I created a matching envelope by die-cutting the flap of THIS red envelope and adhering a piece of the coordinating patterned paper underneath… For day two’s card, I dry embossed the die on the...

One Product, Five Ways- Day 4

Hello and welcome to day 4 of the one product, five ways feature on my blog this week. Today’s card shares another way to use THIS die… I die-cut several trees from THIS watercolor cardstock and adhered them to a panel of the same watercolor cardstock. I die-cut the piece using THIS stitched rectangle die. I used THESE watercolors to apply color over the surface and while it was still wet, sprayed it heavily...

One Product, Five Ways- Day 3

Hi. It’s already Day 3 of the One Product, Five Ways Week and I’m back with a spinner card using THIS die… I love using die cuts for spinner cards. This die was perfect since it is symmetrical. I cut the die twice from cork paper and sandwiched some of THIS between. I created a background using THIS stamp and THIS cardstock. I cut a whole from the panel and front of the white...

One Product, Five Ways- Day 2

Hello. I’m back with another project featuring THIS die. If you missed Day One’s project, click HERE. This time I wanted to die-cut from a different material other than paper. I chose felt in a rainbow of colors. Remember, you don’t always have to do the traditional red and green when creating Christmas cards. There are no rules. Just create what makes you happy. And rainbows make me happy…. I adhered the felt trees...