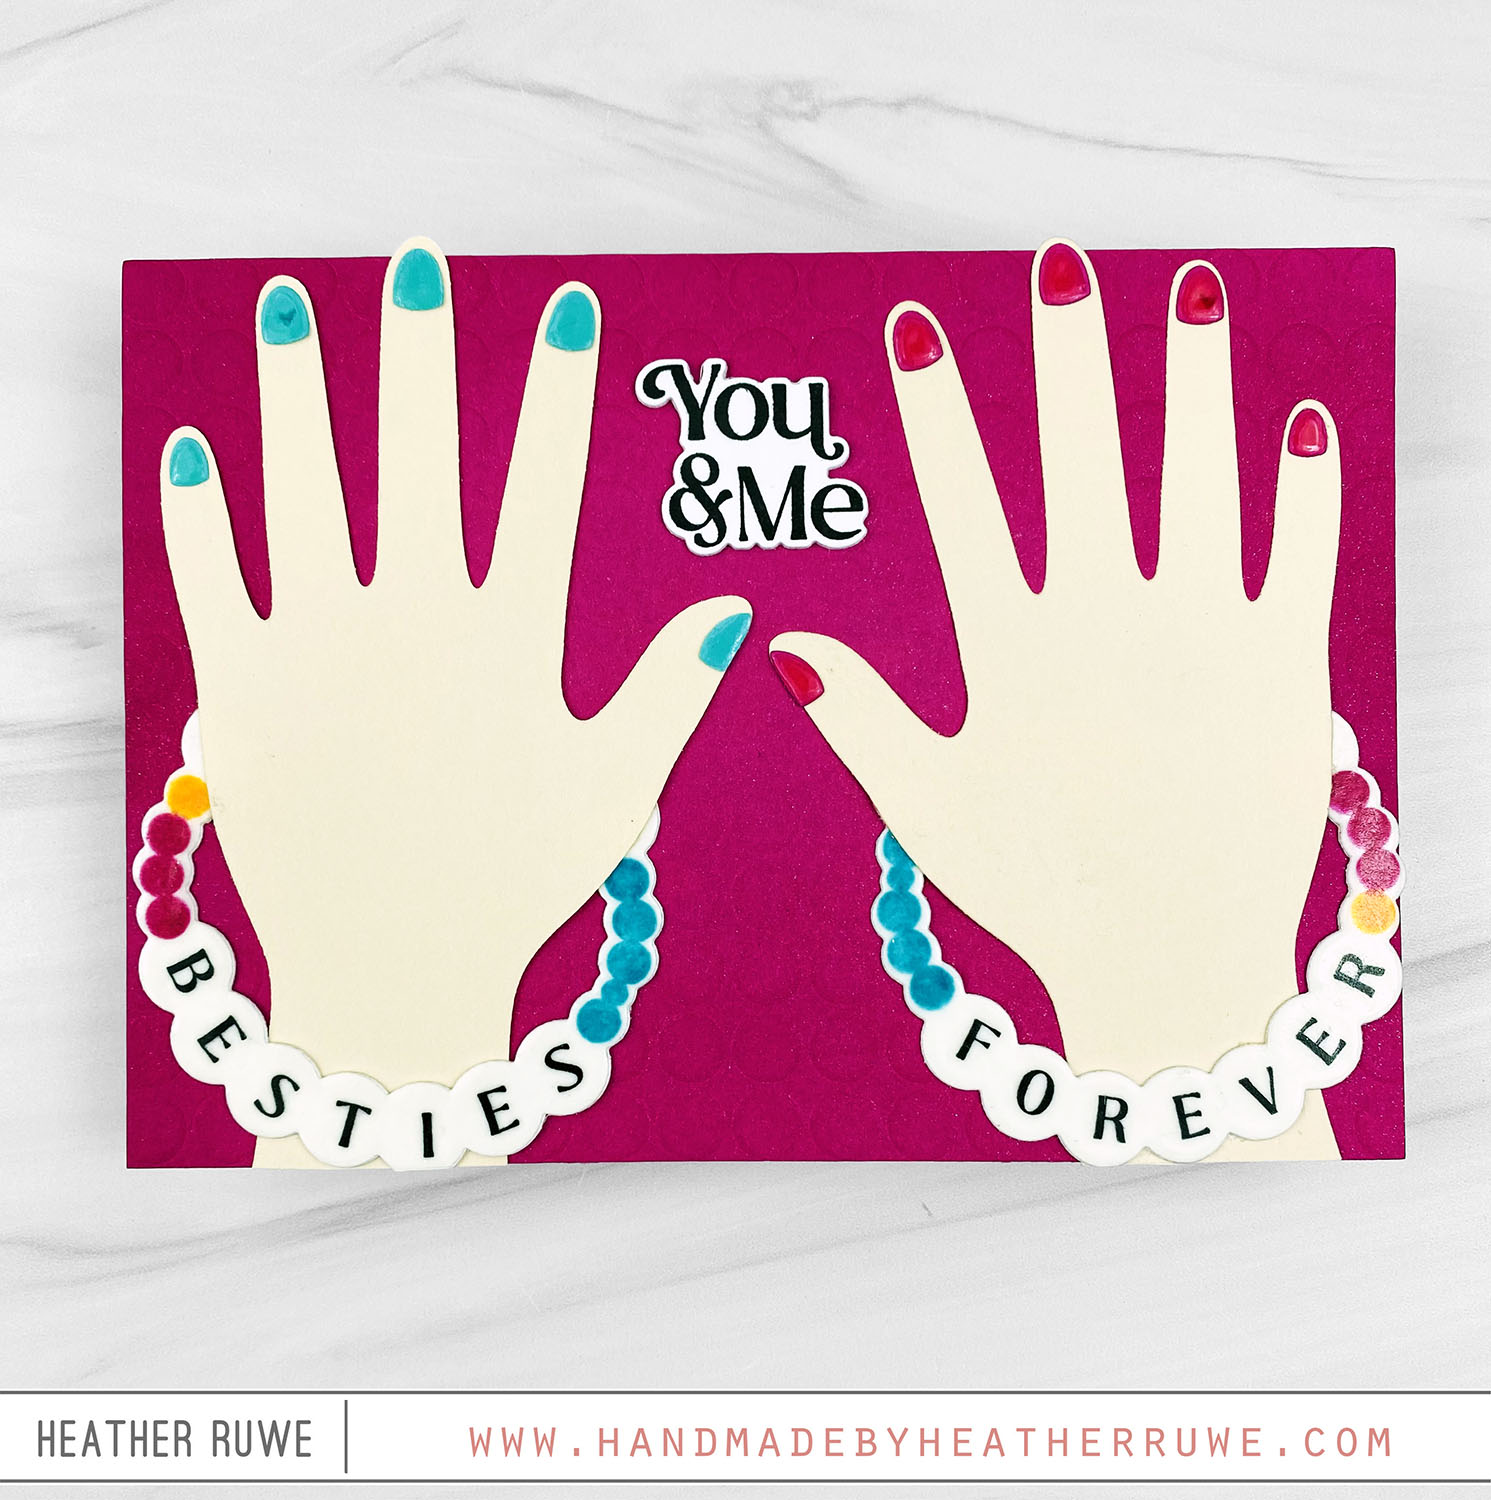
Hello, crafty friends. It’s Father’s Day so I thought it would be a good time to share some tips when creating cards for guys. First, let me tell you how I created today’s card… To create this card, I started by stamping an older background stamp ( on gray cardstock with gray ink for a tone on tone look. I stamped the rock border from THIS stamp set along the bottom to complete the...
Through the Window Card Kit
Hi, crafty friends. Today’s card features THIS new card kit… To create this card, I started by cutting the kit’s teal and cream cardstock with THIS die. I cut them and adhered the teal on top of the cream panel. I added a small strip of pink cardstock where they meet. I white heat embossed a sentiment from the kit’s stamp set along the bottom of the teal portion. I die cut one of...
Happy Graduation Shaker Card
Hi, crafty friends.I have a graduation shaker card to share today… To create this card, I cut THIS die from 5 pieces of black cardstock and adhered them to a piece of A2 sized red cardstock that I stamped THIS graduation sentiment on in the lower right corner. I added some embellishments and THESE stamped graduation caps inside the letters and then adhered a piece of acetate on top. I cut one more die...
Teacher Thank You Card
Hello, crafty friends. Even though summer is over, I always like to stock up on teacher thank you cards to have on hand for the upcoming school year. To create this card, I started by white heat embossing THIS background on kraft cardstock. I trimmed it down and added a white and black mat around it. I adhered the entire piece to a side folding note card. I stamped the same background on red...
Elevate Gift Giving with Die Cuts
Hi, crafty friends. I love to stretch my supplies and today’s project is a great example of using your die cuts to elevate your gift giving…. I die cut THIS die from teal and white cardstock. I die cut the word three times and adhered them together for dimension. I cut two of the shadow dies from white cardstock. I added foam tape between the layers placed a skewer in between to stick in...
Happy Bee Day Card
Hello there, crafty friends. Today’s my birthday so I thought I would share a birthday themed card… To create this card, I applied pink ink through a honeycomb pattern stencil (an older stencil from Honey Bee Stamps) on an A2 panel of white cardstock. I die cut a hexagon shape to create a window and added a stamp bee image from THIS stamp set behind it. I colored it in with Copics and added...
Moments in Time Release Blog Hop
Hi there, crafty friends. I have two cards to share today as part of THIS Blog Hop featuring products from THIS new release… To create these cards, I started with the background. I masked off a section of an A2 panel of white cardstock and blended three colors of Distress Oxide Ink. For the bee card, I blended Picked Raspberry, Wild Honey, and Squeezed Lemonade. For the second card, I blended Evergreen Bough, Peacock...
Moments in Time Release
Hello, crafty friends. Today’s card features THIS new release from Simon Says Stamp… To create this card, I started with the background. I stamped THIS background stamp on a purple A2 sized cardstock panel. I trimmed it down and added it to a gray note card. I adhered it to the bottom right of the card so the gray border would be on the left side and top of the note card. Next, I...
Happy Summer Jeep Cards
Hello, crafty friends. Today’s cards are the cards I created for Aiden’s teachers for the end of the school year. These cards are all about specialty cardsock and how much interest they can bring to your cards and bring to life your die cutting. Random fun fact about me…My first car was a Jeep Wrangler. I still have it and we use it every summer for joy rides and date nights. It always reminds...
Mini Slimline Congratulations Card
Hi there, crafty friends. I have a mini slimline card to share today… To create this card, I started by blending Pink and Yellow Distress Oxide ink on the front of a mini slimline panel. I love the orange it creates where the two colors meet. I spritzed it with THIS spray for some shimmer and shine. Next, I stamped three bunnies from THIS stamp set on white cardstock and colored them with Copic...