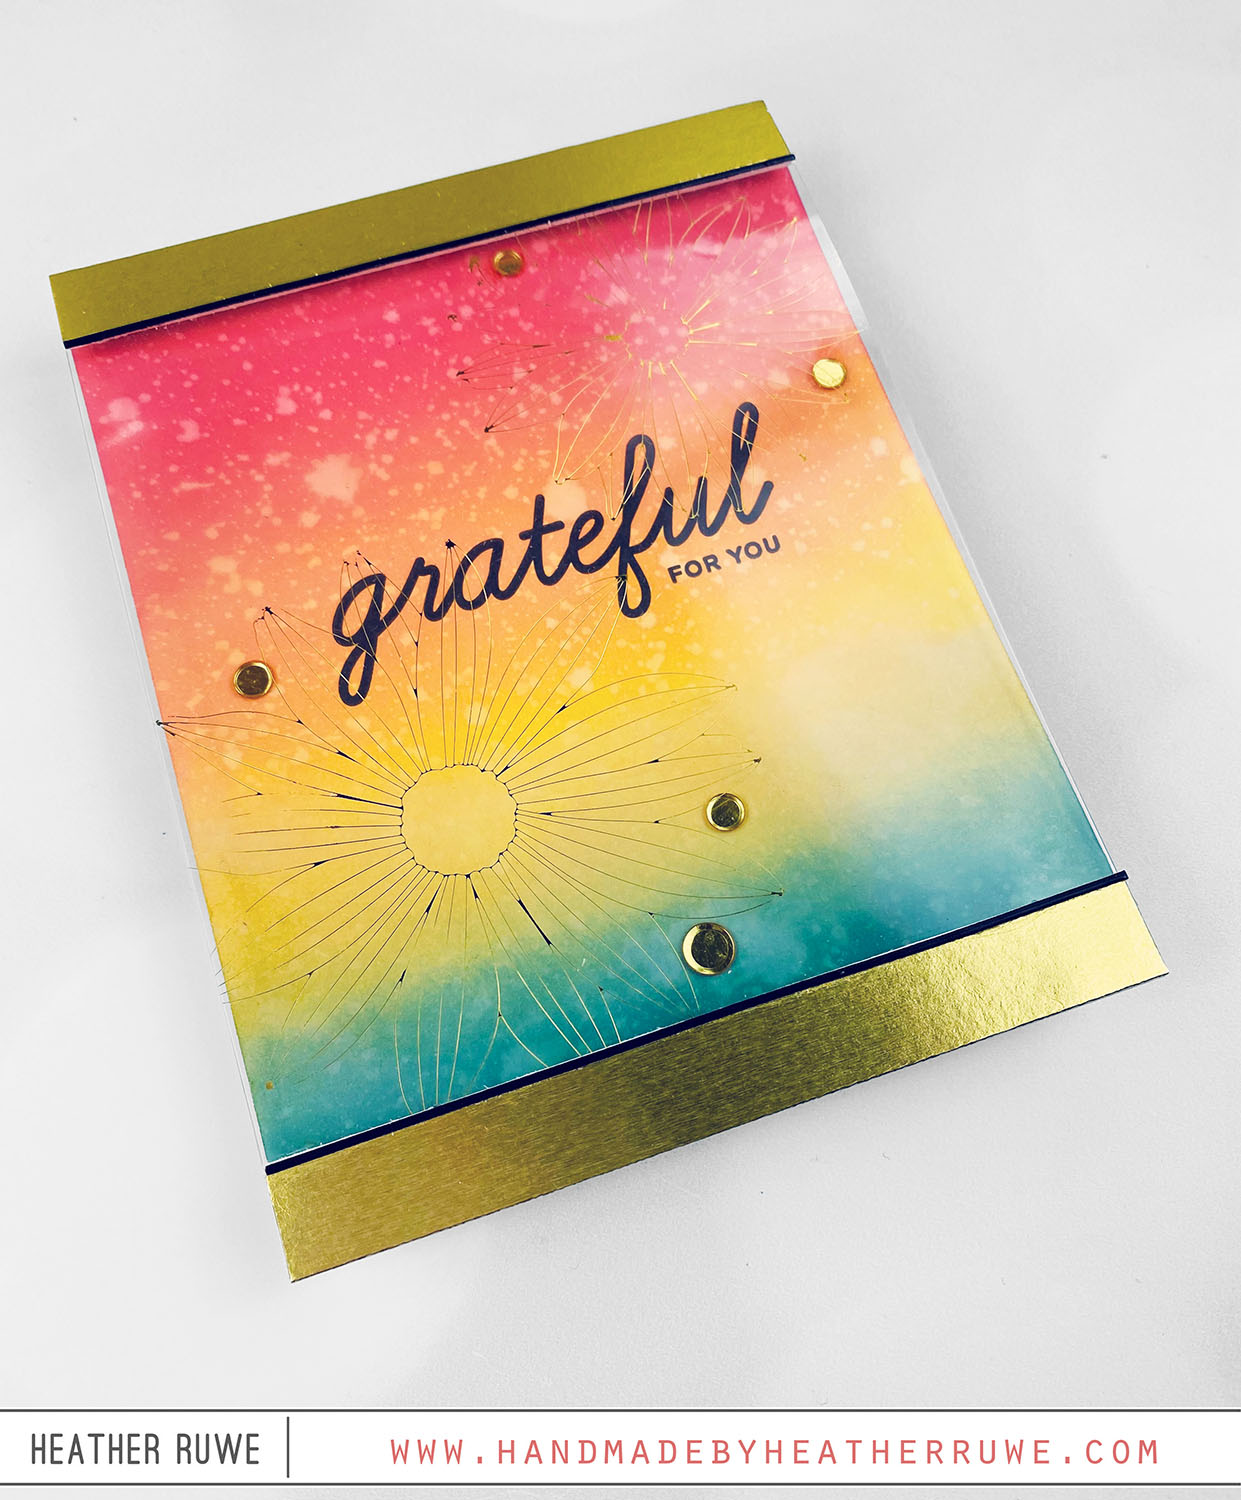
Hi, crafty friends.Today’s STAMPtember collaboration stamp set is THIS one with Clearly Besotted… I started by stamping the images from THIS collaboration stamp set on an A2 white panel. I masked off the images I wanted to be in the very front and continued stamping. After all the images were masked using THIS masking paper, I ink blended the bottom of the panel and stamped the top portion of the panel with THIS background...
Whimsy Stamps STAMPtember 2023 Collaboration
Hello, crafty friends. Today’s STAMPtember collaboration stamp set is THIS one with Whimsy Stamps… I started by stamping the images and sentiments from THIS stamp set on die cut squares. I colored them in with Copic Makers and added glossy accents to the eyes. I stamped a slimline gray panel using all the small images in the stamp set to create a tone on tone background. I finished it off with a strip of...
Gina K. Designs STAMPtember 2023 Collaboration
Hello there, crafty friends. Today’s STAMPtember collaboration stamp set is THIS one with Gina K. Designs… To create this card, I started by stamping the main image from THIS stamp set on an A2 white panel using pink ink. I stamped a sentiment from the stamp set under the image and cut a circle from the center of the main image. I adhered acetate behind the opening. I white heat embossed one of the...
Lawn Fawn STAMPtember 2023 Collaboration
Hi, crafty friends. Today’s STAMPtember collaboration stamp set is THIS one with Lawn Fawn… I started by ink blending the background using Distress Oxide Inks and spritzing it with THIS to add some sparkle and shine to the night sky. Next, I stamped the images from THIS stamp set, colored them with Copic Markers, and used THESE coordinating dies to cut them out. I adhered them on top of THIS white glitter cardstock that...
STAMPtember 2023 Blog Party
Happy STAMPtember, crafty friends! The STAMPtember fun continues with a blog party! I’m thrilled to be part of it and I’m sharing a couple of cards celebrating THIS new STAMPtember release from Simon Says Stamp… For the first card… I applied drops of Distress Paint along the side of an A2 white panel. Using THIS tool, I drug the paint across the paper creating a fun background. I stamped THIS sentiment and used THESE...
STAMPtember Inspiration + New Distress Christmas
Hello again, crafty friends. I’m back with more inspiration using THIS new STAMPtember release along with some fun new products from Tim Holtz… I started by applying THIS texture glitter paste through THIS stencil on a 5 x 7 white cardstock panel. Next, I die cut THIS die a few times from white cardstock and used THIS and THIS Distress Mica Stain to add color to them. I hot foiled THIS sentiment and used...
STAMPtember 2023
Happy STAMPtember, crafty friends! If you are unfamiliar with STAMPtember, it’s a month long celebration of stamping and crafting hosted by Simon Says Stamp. There is so much fun in store for this month but let’s start with a Halloween card I created with THIS STAMPtember release… To create this card, I started by die cutting THESE strips from black glossy and white cardstock. I used the back side of each strip that picks...
Slimline Halloween Card
Hello there, crafty friends. Happy Halloween! I thought I’d share a Halloween card today to celebrate… I started by ink blending a night scene using Distress Oxide inks on the front of a slimline card base. I spritzed THIS on top for some texture and shine. Next, I cut THIS pumpkin house and accessories from colored cardstock and the door from THIS woodgrain cardstock. I added ink to the edges of the die cuts...
Witch Silhouette Card
Hello there, crafty friends. I’m back with even more Halloween inspiration… To create the background, I started by applying Distress Oxide ink with THIS stencil to create some colorful clouds. I stamped the images and sentiment from THIS stamp set using THIS black pigment ink. I finished off the design by adding gold stars cut with THIS die, a favorite of mine for creating embellishments. I also decorated the flap of the envelope with...
Frankenstein Halloween Card
Hello, crafty friends. I have a Halloween card to share today featuring THIS stamp set… I started by die-cutting THIS strip from white and black glossy paper. I adhered the strips to the front of a white side folding card base and stamped a sentiment from THIS stamp set on one of the white strips using black pigment ink. I added clear embossing on top and heat set. Next, I die-cut a stitched circle...