
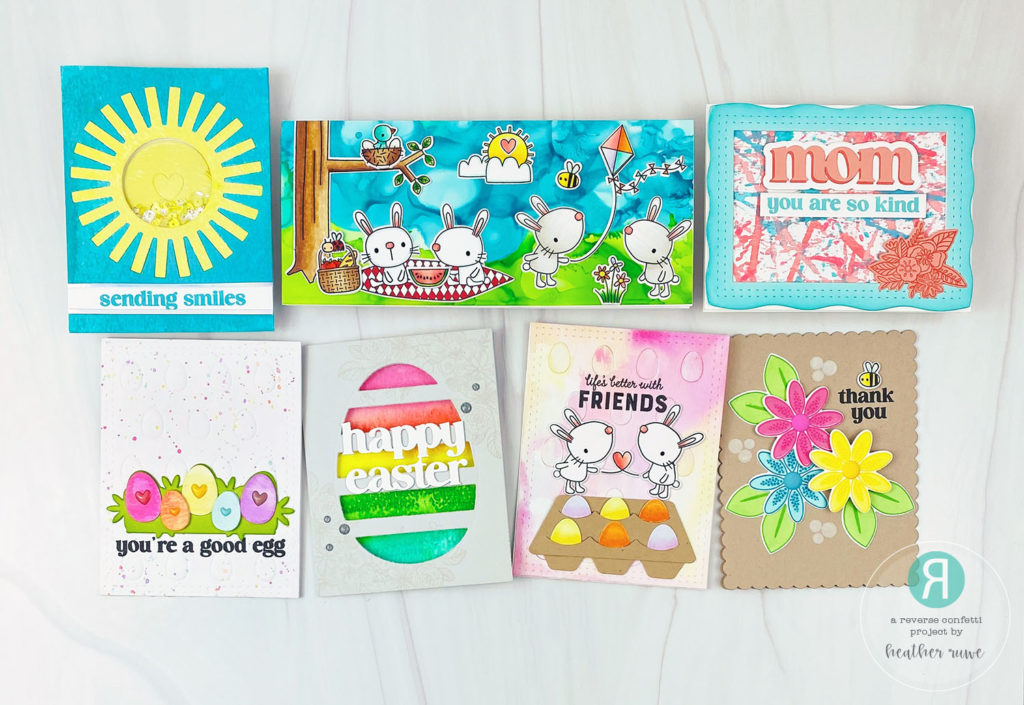
Hello, crafty friends. Reverse confetti has a new release HERE and I have lots of inspiration to share using the new products…
VIDEO
I created a walk through video for them of the new release sharing inspiration as well. You can find that video HERE on Reverse Confetti’s YouTube Channel or click on the video below…
Since I have so much inspiration to share today, I will share the supplies used at the end of each card to make it easier to find supplies. I will link to the entire release at the end of the post.
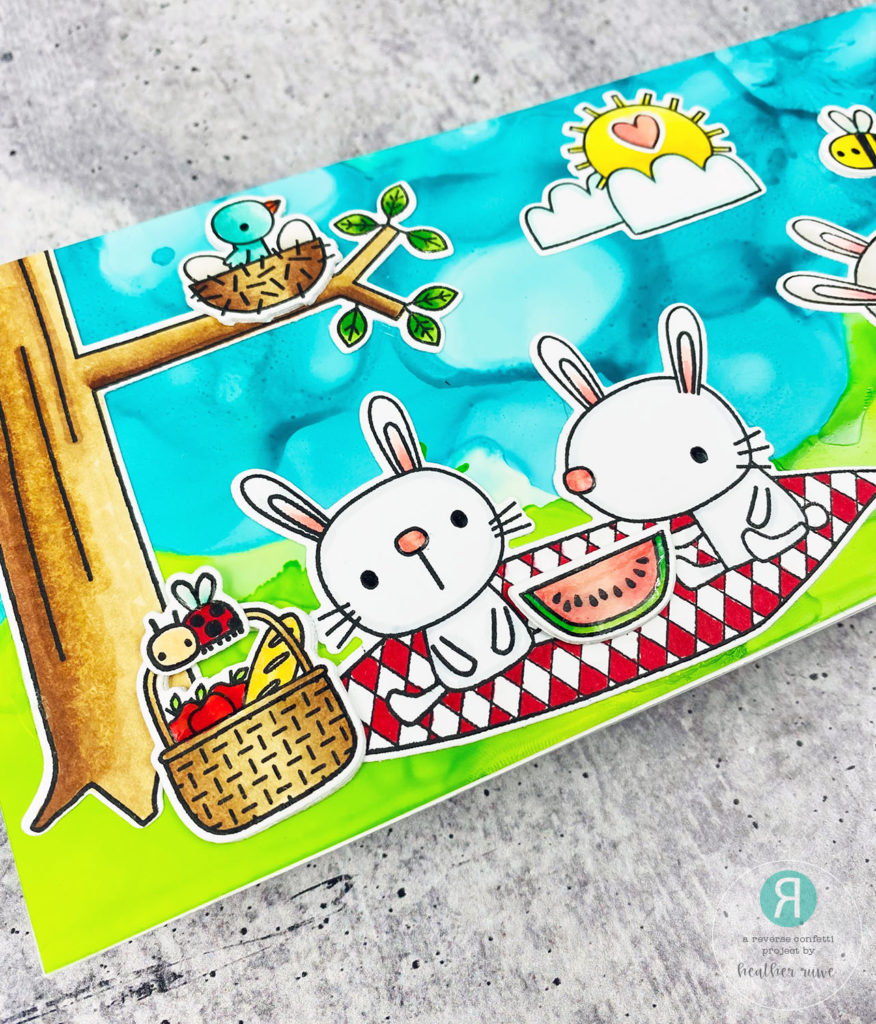
For the first card…
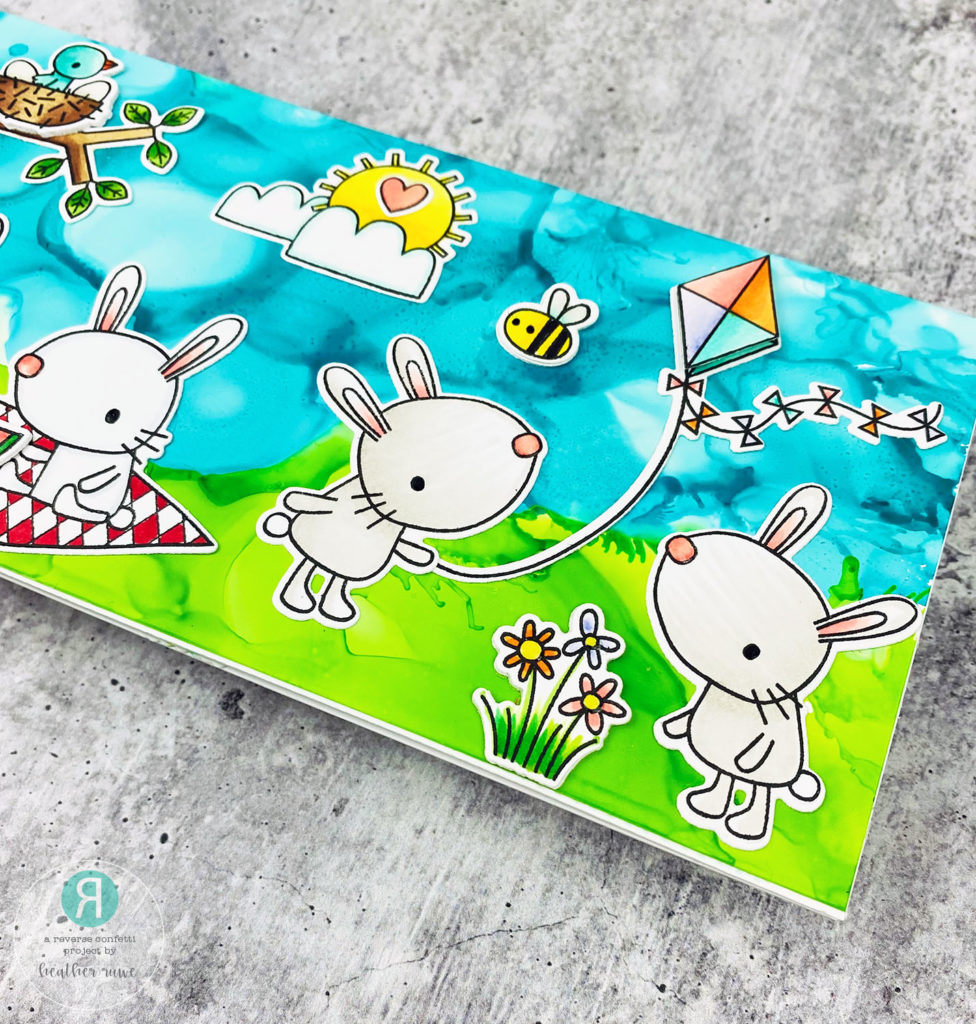
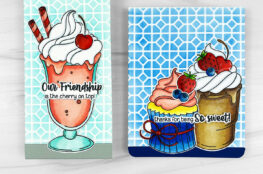
 I applied blue and green alcohol ink to a slimline Yupo panel. I stamped and Copic colored the images from the Better with Friends and the Picnic Pals stamp set. I used the coordinating dies to cut them out and added them to the alcohol inked panel. I love how well these two sets work together to easily create a cute scene…
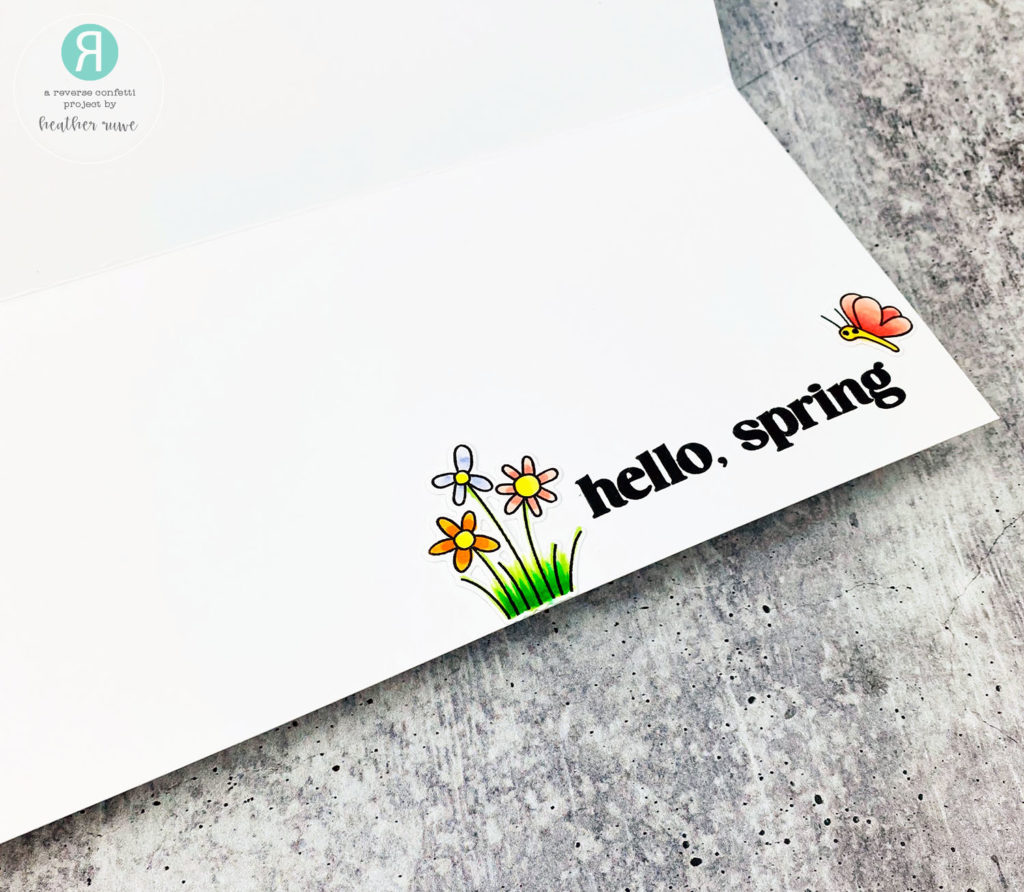
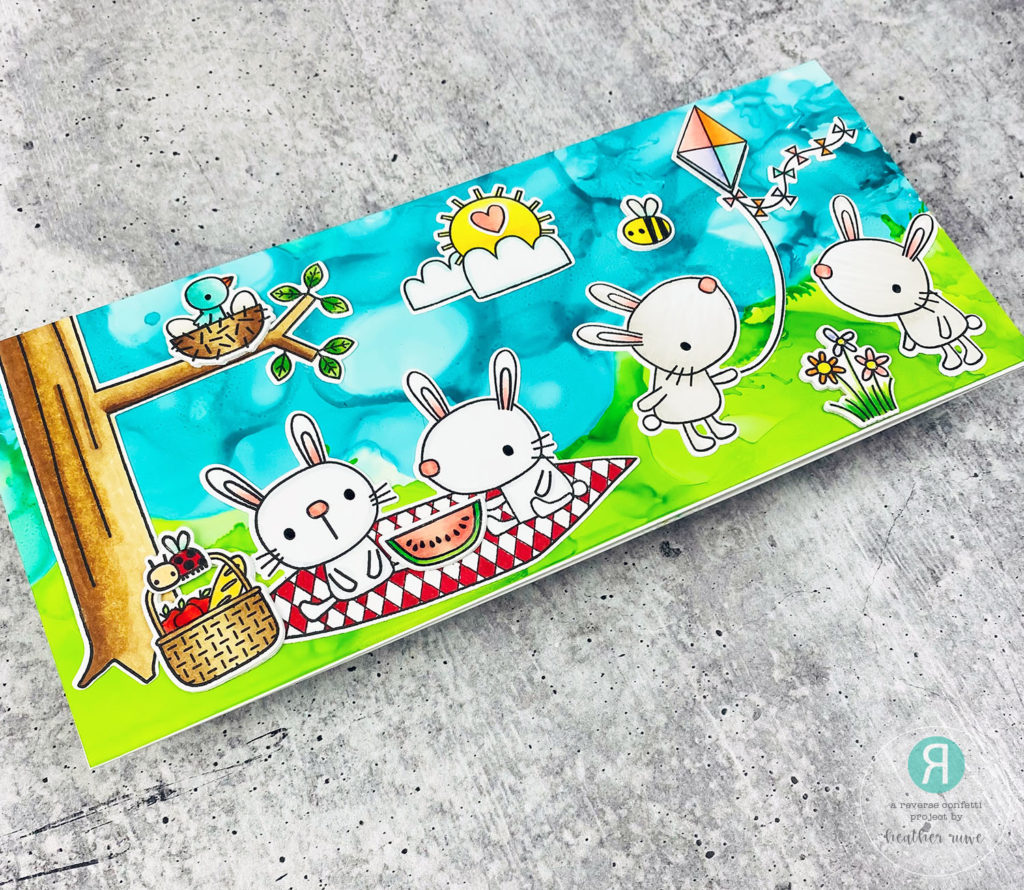 I had a few stamped images left so I added them to the inside of the card as well as a sentiment from the Springtime Sentiments stamp set…
 I finished off the design by adding crystal glaze to some of the images for some shine and used a black glaze pen on the critter’s eyes to make them pop…
 LINKS TO SUPPLIES USED:
(Affiliate links used at no extra cost to you. Thank you for your support.)

Next up…
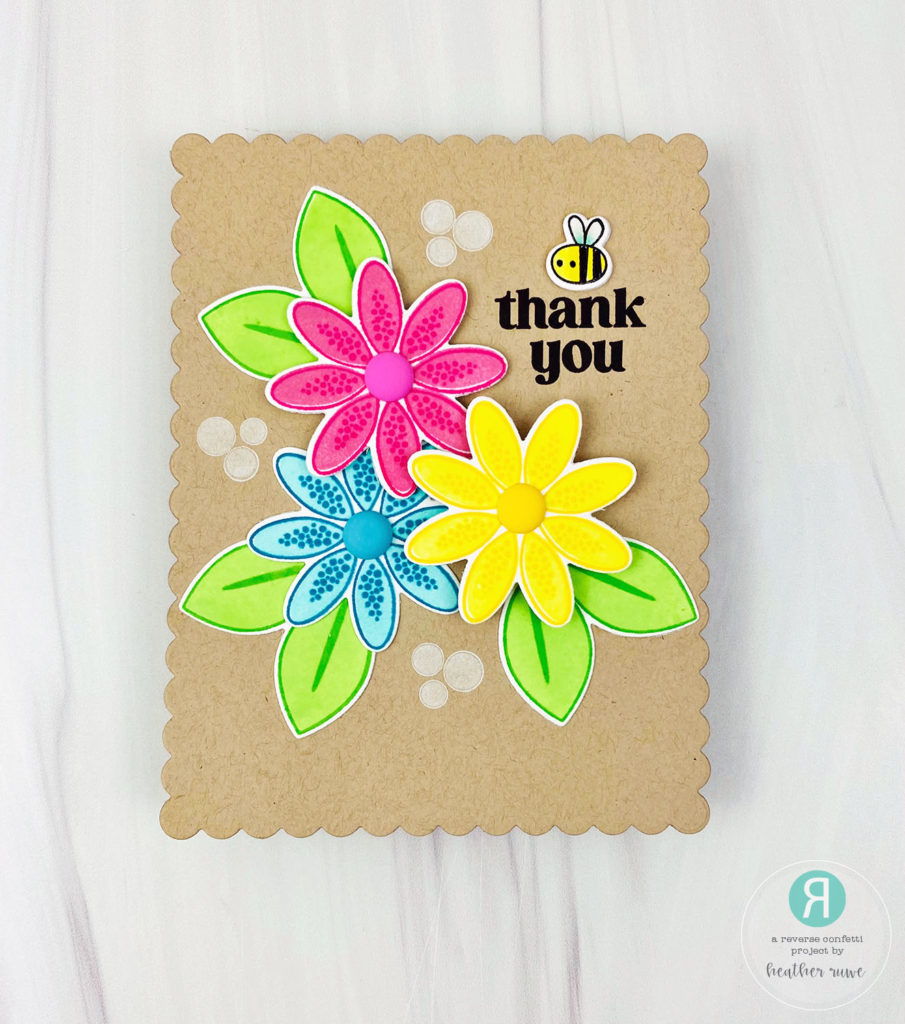
I die-cut the scalloped rectangle die from the Easter Cover Panel die twice and scored a line at the top of the inside panel. I added adhesive above that line to create a card base. I stamped the layers of the flower and leaf images from the Sending Smiles stamp set and used the coordinating dies to cut them out. I adhered them down to the card base at different heights. I adhered the blue flower down directly to the card base. I added foam squares to the back of the pink flower and adhered them down next. Finally, I added the yellow flower by adding two layers of the foam squares. This allows them to be tighter together in the cluster.
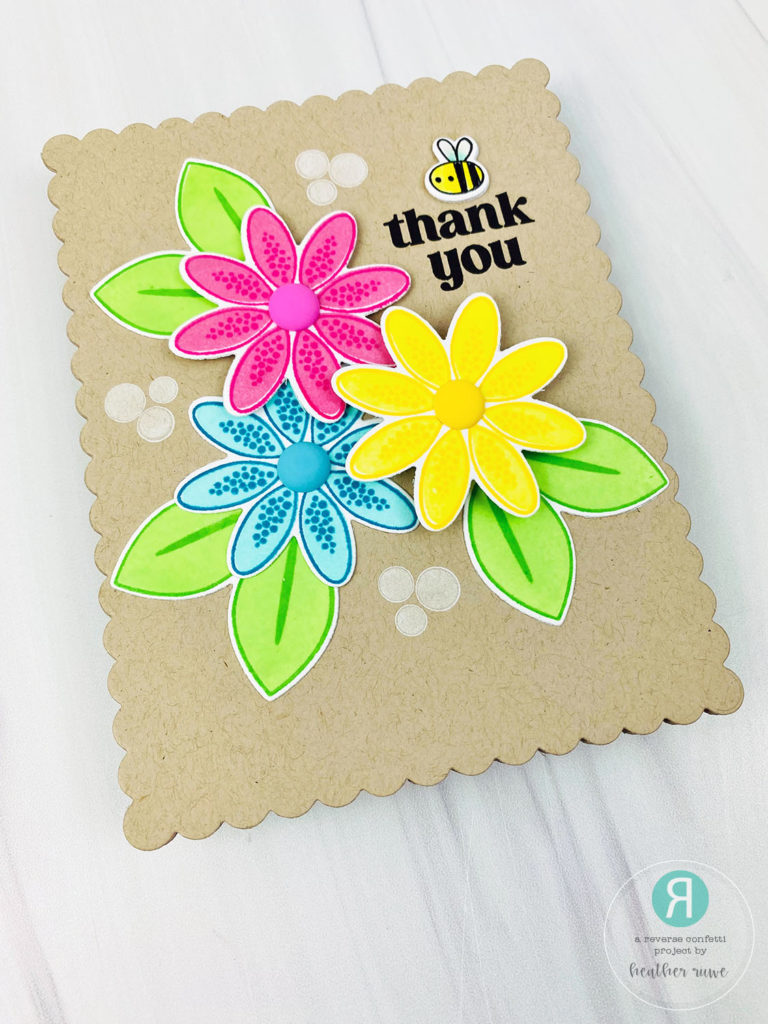
I stamped a sentiment from the same stamp set. I wanted it to be vertical instead of horizontal, so I cut it down the center. I finished off the card by adding a bee image from the Better With Friends stamp set and stamping some circle clusters with white pigment ink from the Dot to Dot stamp set.
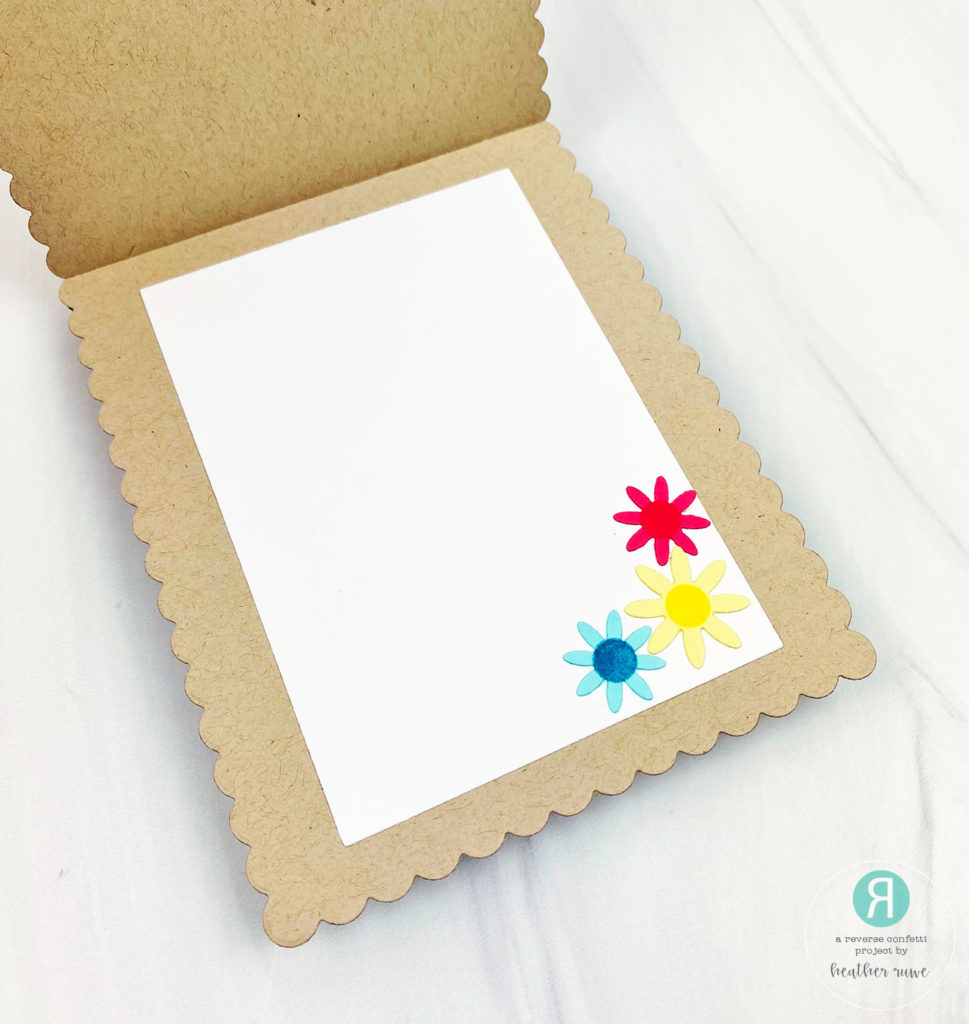
I also added a few flower die-cuts from the Easter Cover Panel die set on the inside to tie everything together…
 LINKS TO SUPPLIES USED:
(Affiliate links used at no extra cost to you. Thank you for your support.)
For the next card…
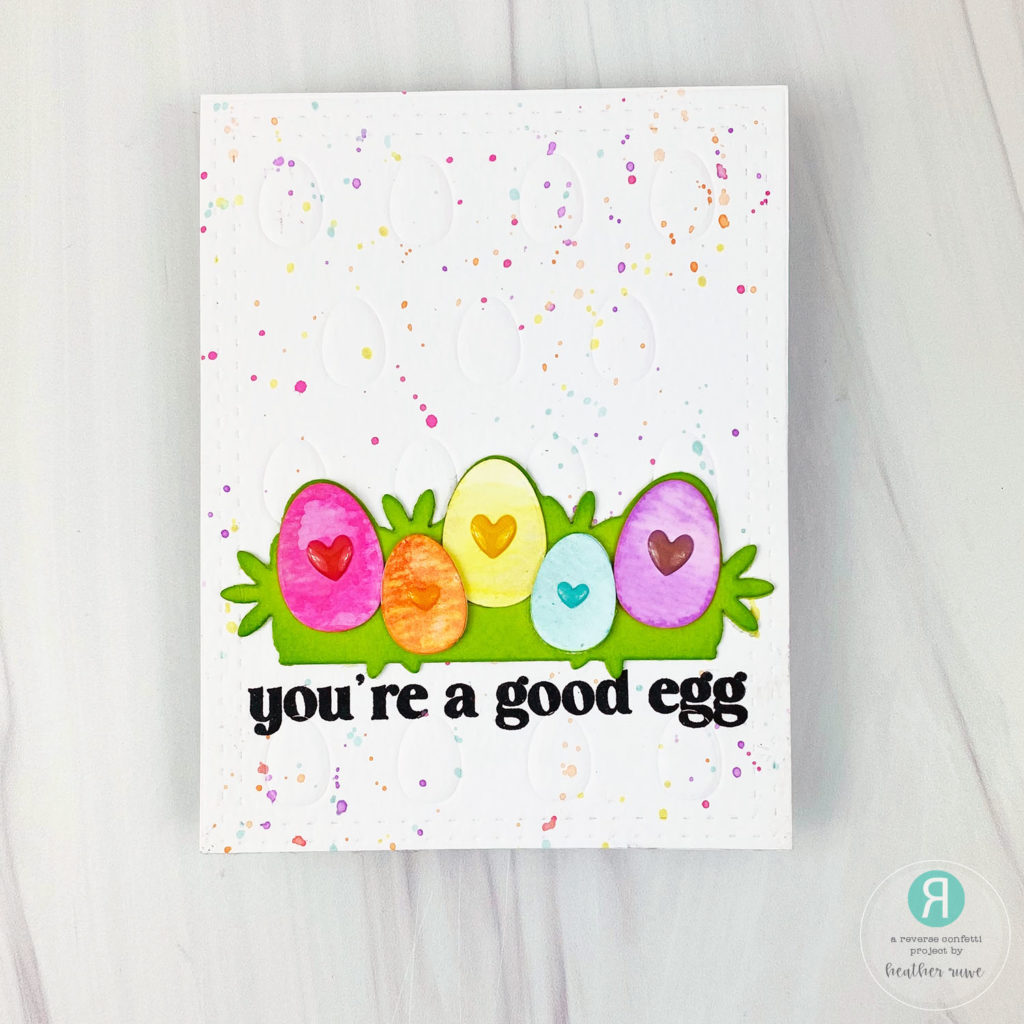 I embossed the Eggstra Cover Panel die on a white panel. To emboss a die instead of cutting it, you use an embossing mat in your die-cut machine. It presses the pattern into the cardstock which worked well with this design because it gave the eggs a rounded, puffy shape. I added some splatter on top by applying a rainbow of Distress Oxide inks to my glass mat and adding shimmer spritz to each. I mixed it with a paintbrush, picked up a bit of color and flicked it in random spots.
![]()
I die-cut the silhouette image from the Easter Cover Panel die set from green cardstock to resemble grass and added a rainbow of eggs cut from the large and small egg dies from that same set. To “dye” the eggs, I placed them in each puddle of ink from before. I adhered them to the green grass and added an enamel heart on each. I finished off the card with a sentiment from the Springtime Sentiments stamp set.
LINKS TO SUPPLIES USED:
(Affiliate links used at no extra cost to you. Thank you for your support.)
Next up…
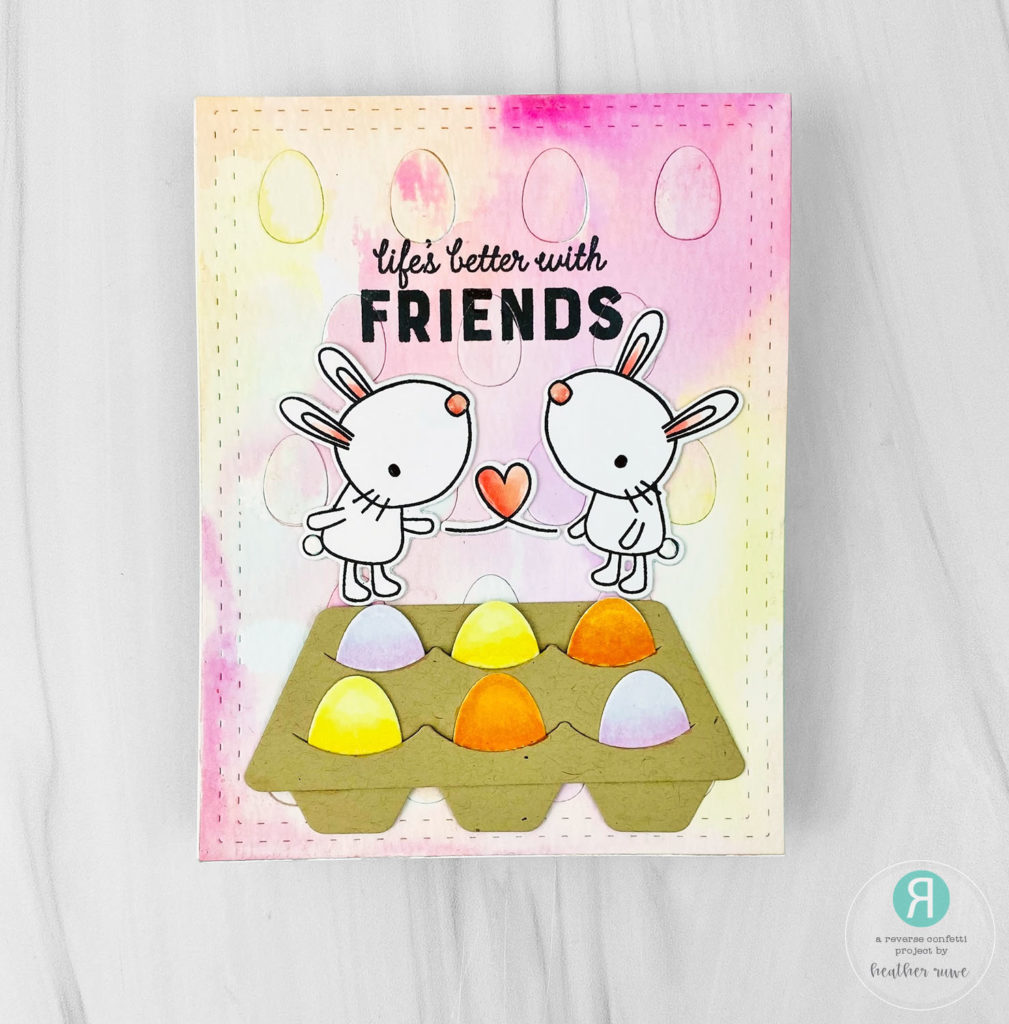
I used the leftover Distress ink/shimmer spritz ink and swiped a piece of watercolor cardstock through it to create a quick background. Once it was dry, I die-cut the Eggstra Cover Panel die from it and adhered it to a card base. I stamped the sentiment and critter images from the Better with Friends stamp set and used the coordinating dies to cut them out. I also cut the Egg Carton die as well as the egg die in the set. I Copic colored the eggs and slid the in the slits that the egg carton creates.
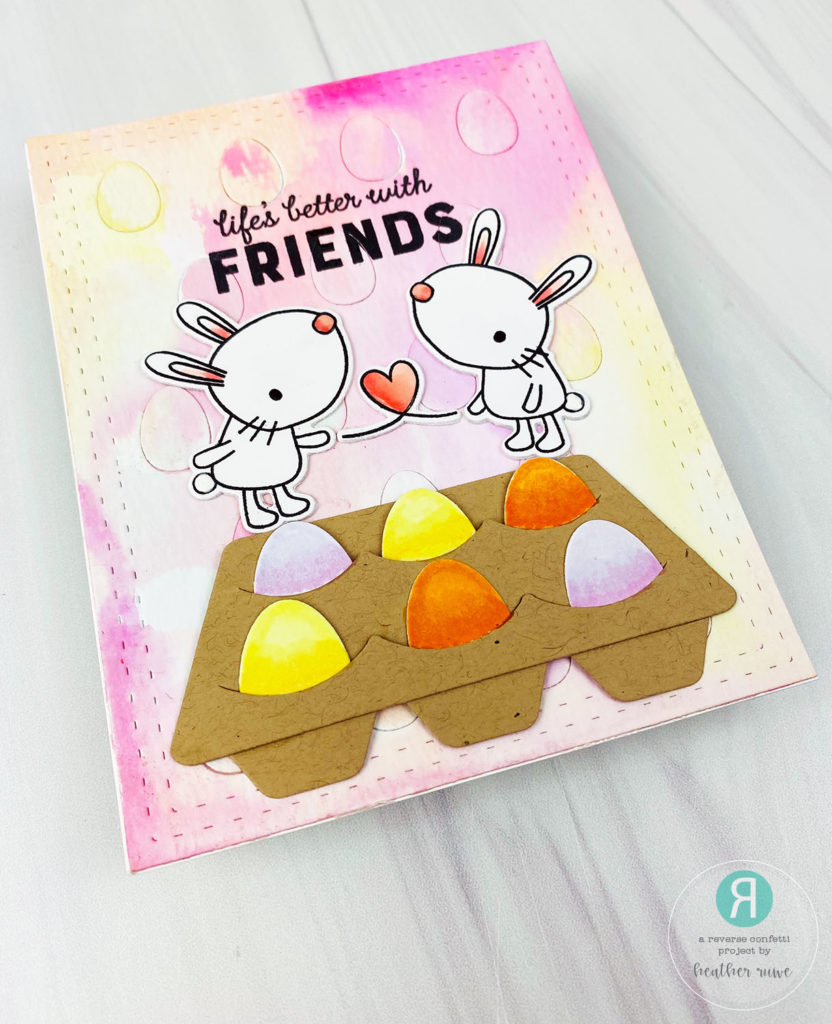
LINKS TO SUPPLIES USED:
(Affiliate links used at no extra cost to you. Thank you for your support.)
Next up…
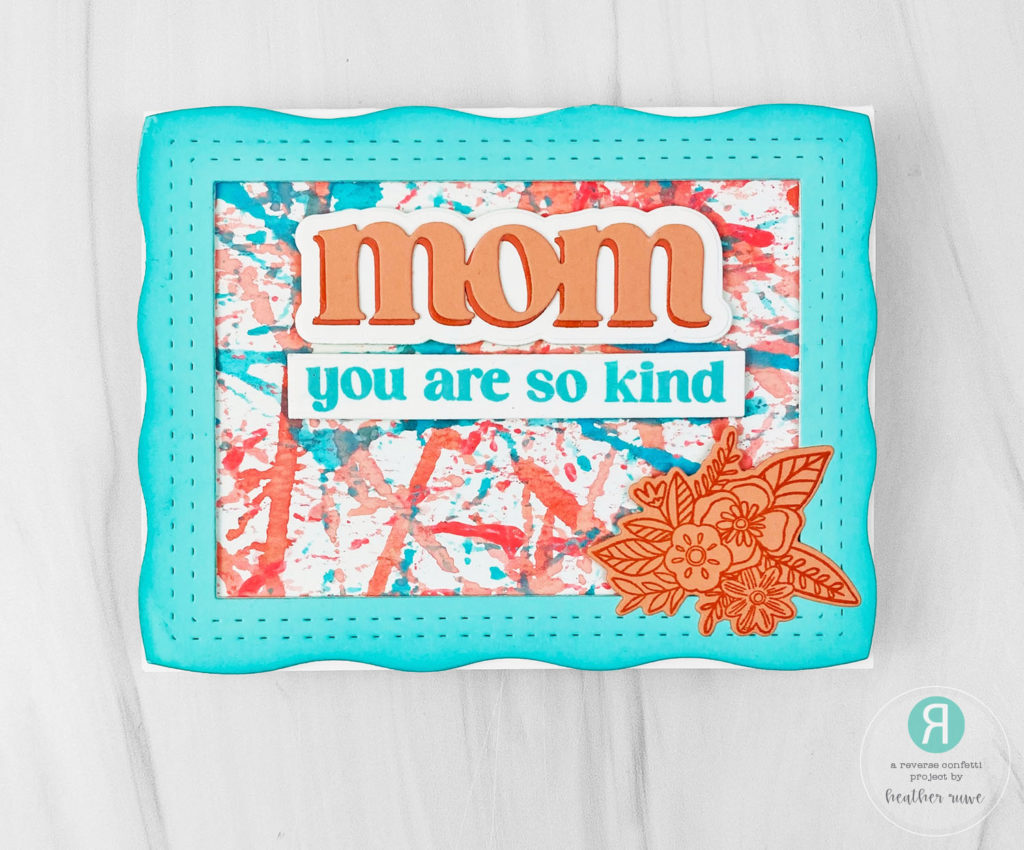
I die-cut the frame from the Layered Mom with Frame die set and adhered it on top of a marble painting background that I had leftover. You can find out how I did the marble painting HERE. I die-cut the mom word from two shades of peach cardstock and adhered them together off set to create a drop shadow and then added it to the shadow die-cut cut from white cardstock. I stamped a sentiment underneath from the Sending Smiles stamp set and finished it off with a tone on tone stamping of a floral image from the Friendly Florals stamp set.
A closer look…
 LINKS TO SUPPLIES USED:
(Affiliate links used at no extra cost to you. Thank you for your support.)
For the next card…
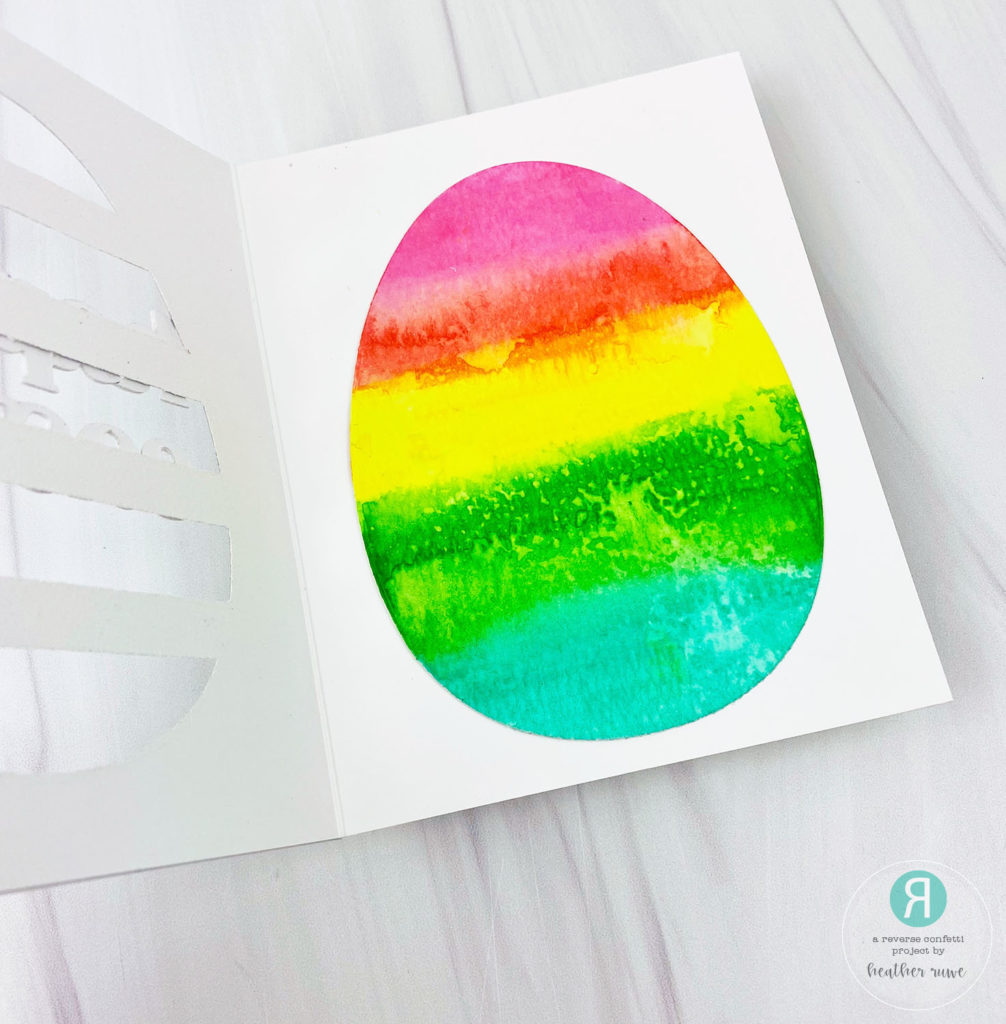
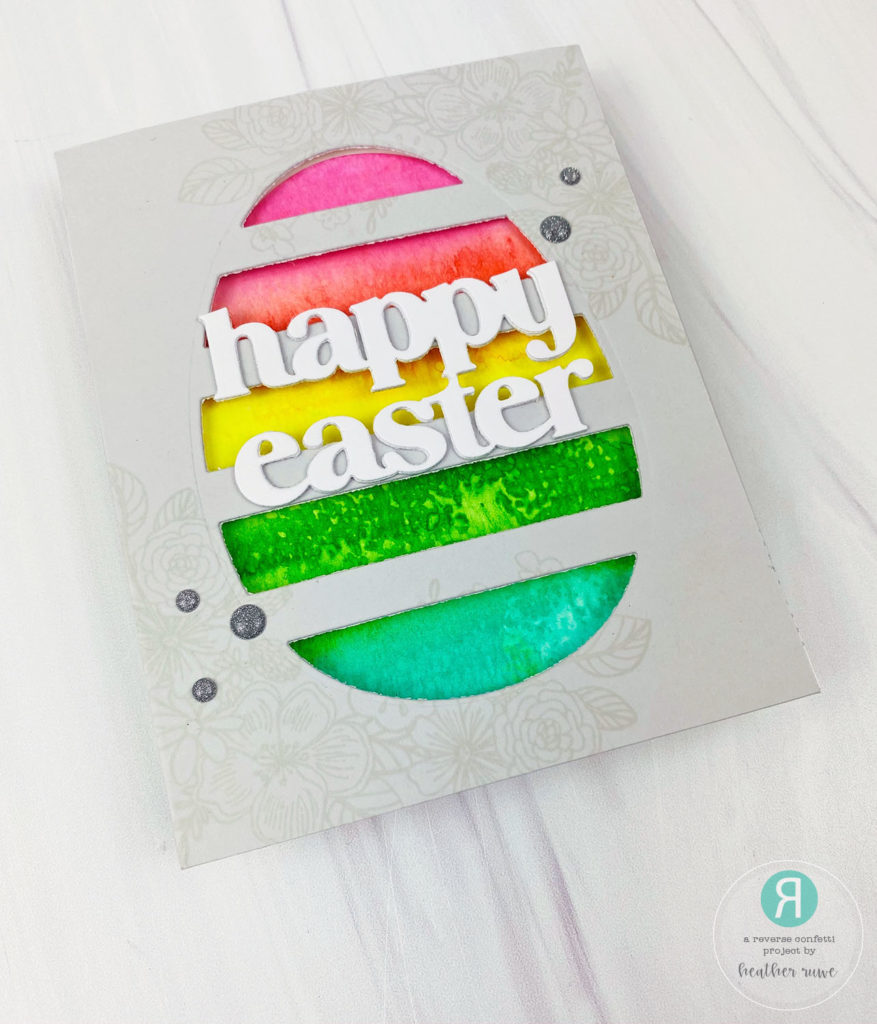
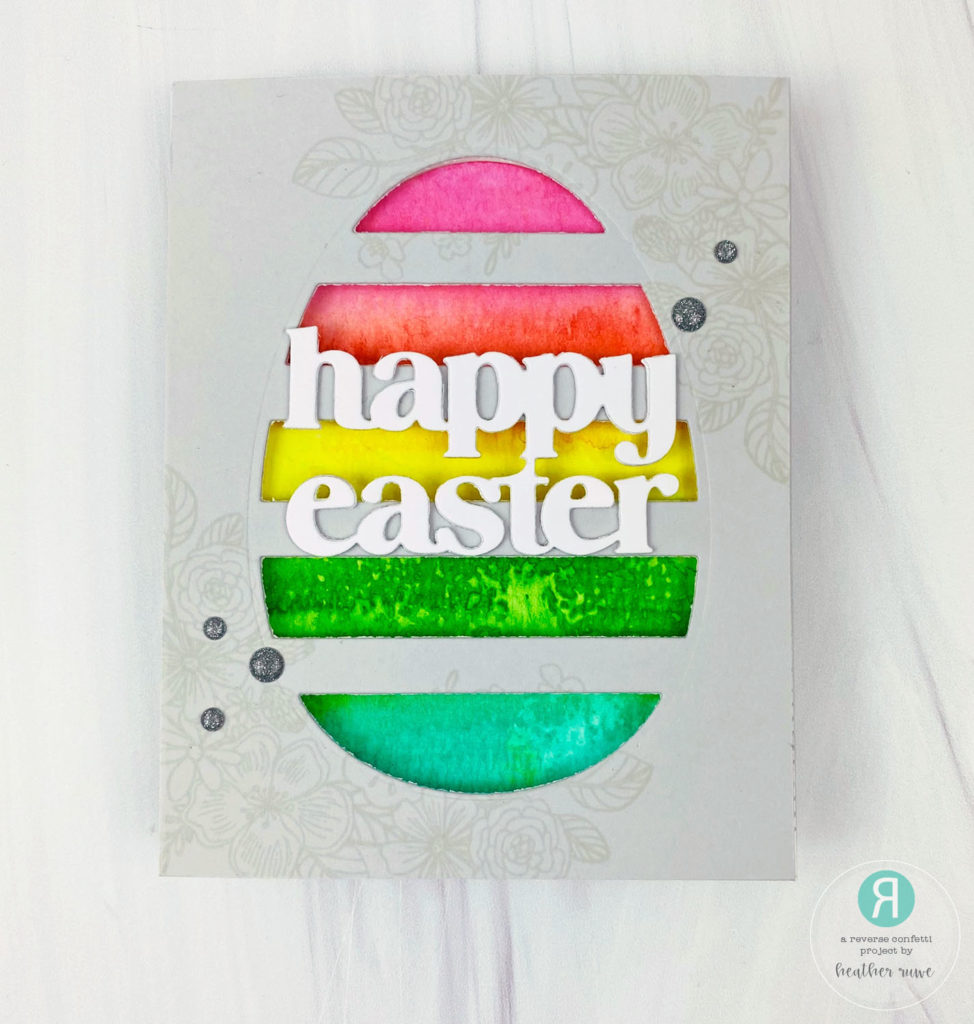 I covered an A2 size card with gray cardstock and stamped a floral image from the Friendly Florals stamp set in the corners for a subtle, tone-on-tone look. I die-cut the smaller egg from the Big Egg die set to create a window peeking into the inside of the card. I die-cut the large egg from the same set from a rainbow watercolor panel and adhered it behind the window so the different colors would show through…
I finished it up with a happy easter die-cut from the Easter Cover Panel die set and a few silver embellishments.
 LINKS TO SUPPLIES USED:
(Affiliate links used at no extra cost to you. Thank you for your support.)
For the final card…
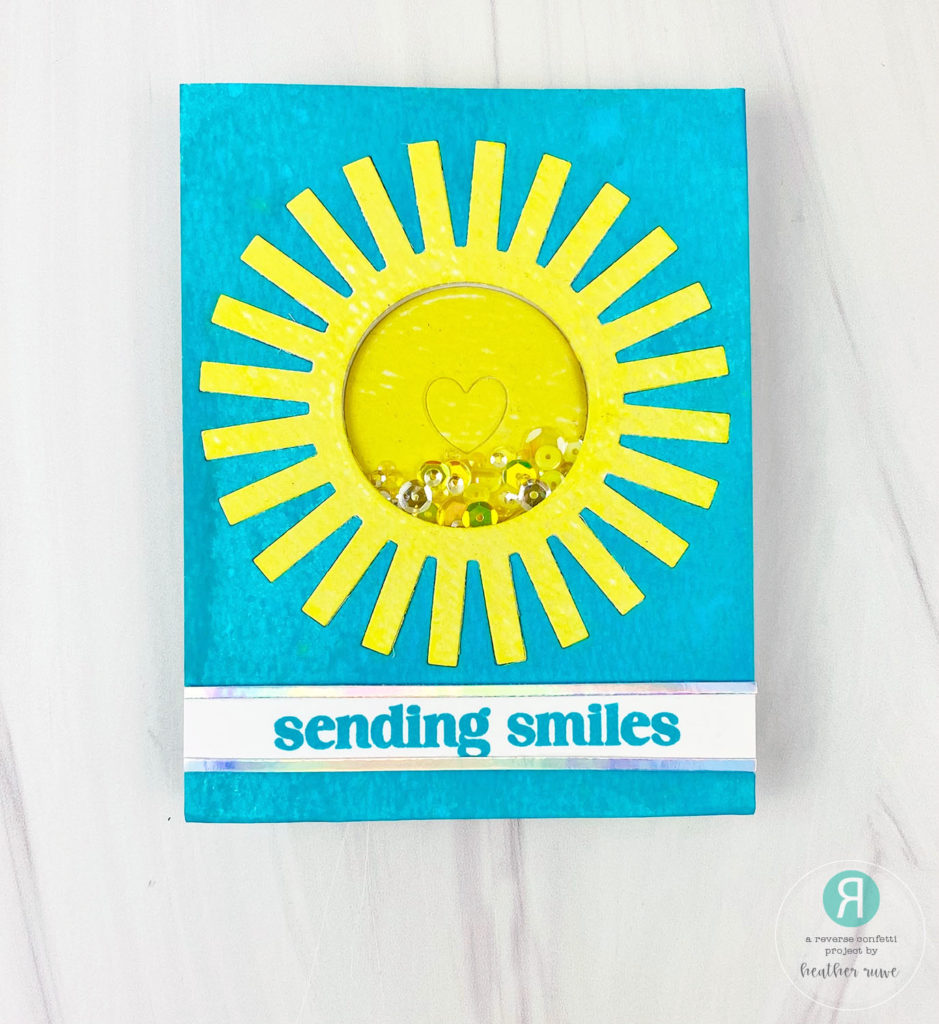 I covered an entire watercolor cardstock panel with Salvaged Patina spray stain. After it was dry, I die-cut the Big Sun Die from it and from another white piece of watercolor cardstock. I added yellow ink to the sun die-cut to quickly color it and sprayed shimmer spritz on top for some shine. I adhered the center of the sun directly to the card base and added a few sequins on top. I added foam tape around the circle to trap the sequins and then added the sun rays portion of the die on top with a piece of acetate adhered to where the circle opening was. I adhered down the panel around it and finished it off with a sentiment from the Sending Smiles stamp set.
Here’s a closer look…
![]() LINKS TO SUPPLIES USED:
LINKS TO SUPPLIES USED:
(Affiliate links used at no extra cost to you. Thank you for your support.)
BLOG HOP
There is more inspiration to see using this release. Click HERE for the next stop on the hop. Click HERE to start at the beginning of the hop. Here’s the complete Blog Hop list…
Thank you so much for spending some time here. I would love to hear your favorite product from the release.
I’ve linked to the entire release below. Have a great day.
LINKS TO THE ENTIRE RELEASE:
(Affiliate links used at no extra cost to you. Thank you for your support.)
March 9, 2022
Lots of great ideas in one place! That first card is particularly impressive, and super cute!
March 9, 2022
Heather, so many amazing cards! Wow! Love them all!
March 8, 2022
Wow, you’ve been busy! Love them all Heather!